Seat restoration
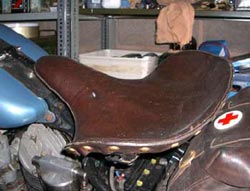
Among the spares that came with the bike there was an original ‘tractor’ seat pan with the long ‘T’ bar, it was in a rather sorry state with the pressed steel being badly bent & rusted. A good wire brushing revealed that it was salvageable, but with some nasty bends, dents & holes. The bends & dents succumbed to a propane torch and a 2lb hammer. The holes were more problematic as my welding skills are minimal and get worse in direct proportion to the the thickness of the metal being welded, but by using a big lump of aluminium as a heat sink and post welding treatment with my trusty angle grinder the pan looked a lot better. The rust pits were filled with body filler & several coats of paint applied. Never having seen this type of seat before the method of covering the pan was a mystery, the remains of several original rivets were in place, but they had been turned-over under the seat leather & I couldn’t figure out how this could be done. The Auto-jumble at the Motor Museum (can’t spell Bewly) turned up the answer, on one of the stands there was a recoverd 45 seat (£120 !) which I had a good look at and all was revealed. A strip of leather is riveted around the outside (not the sit-upon bit) of the seat pan, overlapping the metal edge by about a 1/4". The top leather being sew to this around the edge, all very simple when you see how it is done.
The problem with a lot of restoration/repair work is finding the ‘stuff’ required, I though that a bit of felt between the leather & the steel might well insulate my tender parts on cold mornings, but finding thick felt is not that easy, fortunately the local upholstery shop turned-up some off-cuts of something suitable and probably a couple of layers of carpet underfelt would do the trick.
I had bought some leather to make a saddle bag & an offcut of this was enough for the seat cover. Apart from some contact adhesive and leather sewing kit, the only other items needed were some sand bags, these I made up in calico on our old treadle sewing machine (10/- at an auction in 1968 & still going strong)
Firstly the a leather strip about 1 inch 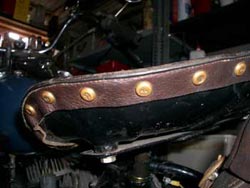 wide was rivetted on to the seat pan overlapping by about ¼ inch (I made up some fancy rivets but must admit this is guilding the lily). The plastic backed thick felt from the upholsterers was glued down to the seat pan with contact adhesive (in strips as it was difficult to get it to conform to the seat shape in one piece) then the joints tacked together with thread, (if using plain felt it could be damped & held in place with the sandbags)The leather for the cover was roughly cut to size and soaked for an hour in warm water, this makes it quite flexible and can be pushed & pulled onto the felt covered seat pan. The sand bags are then loaded on to push the leather into the concave part of the seat pan and conform to the shape at the front. All this was left for 36 hours to thoroughly dry out. When dry the leather will be found to stay in the shape of the seat, it can then be glued down to the padding with impact adhesive. The edges of the rivetted strip & the cover were sewn together, pulling the leather so as to conform neatly with the seat pan, particularly at the front. I found that it worked best if several temporary stitches were made at intervals around the seat to be sure that the seat cover & strip line up all the way round. Finally the edges were trimmed and rubbed with beeswax.
| Home | Back to Bikes | Back to 45 |